Party Checklist
The following is a list of things you should consider to help you plan your party.
- Date and time
- Guest list
- Type of event (i.e. Casual to Formal)
- Location (i.e. rent a hall or at home)
- Indoors or out
- Invitations
- What type of food
- Catered or not?
- Are you serving alcohol?
- Do you need a bartender?
- Do you need rentals? (tents, portable toilets, tables/chairs, BBQ, dishware, linen)
Print off this check list to be sure you will have everything for a successful party. Call us for ideas and rental help before you plan your party.
- Barbeques
- Ice tubs
- Tents & canopies
- Decorations
- Tables
- Chairs
- Portable bar
- Fill n’ chill table
- Chafing dishes
- Champagne fountain
- Coffee urns
- Miscellaneous serving pieces
- Serving trays and platters
- Salad bowls
- China and flatware
- Glassware
- Linen
Napkin Folding
Fanfare

Party Hat

Handkerchief

Fanciful Butterfly

Classic

Obi Basket

Palm Leaf

What Knot

Equipment Instructions
Barbecue
Barbecue Lighting Procedure
- Ensure that the gas control valves are in the “off” position
- Check to ensure that the cylinder contains fuel
- Turn the cylinder gas valve to full “on” position
- Open the top of the barbeque
- Turn one of the gas control valve to the “light” or “on” position
- If the unit does not light, try the igniter again, up to a maximum of 3 times
- If the unit has not lit, shut the gas control valve and allow the unit to air for at least 2 full minutes
- After airing, turn the gas control valve to the “on” position and try to light the burner again
- If the burner will still not light, turn off the gas and allow the unit to air again
- If the burner will still not light, turn of the gas and allow the unit to air our again
- Turn the gas control valve to the “on” position
- Light the open flame barbeque light and the burner should light
- If the unit still fails to light, shut off the gas at the cylinder and arrange to have the unit repaired
Barbecue Safety Tips
- Never light the barbecue with the top closed.
- When shutting the barbecue off, always turn the cylinder valve off first, then the heat control valves.
- When changing cylinders, always make sure that the valves are closed first
- When opening or closing the cylinder valve, make sure that you open or close it all the way
- Never store propane cylinders indoors, in the house, garage, or tent.
- Never use your barbecue to cook inside the house, garage or tent.
- Never use your barbecue as a source of emergency heat.
- Keep your barbecue at least 10 feet away from open doors or windows.
- Keep your barbecue at least 12 inches away from combustible wall surfaces.
- Always have someone responsible watching the barbecue when it is in use.
- Store your propane cylinders out of direct sunlight and in compliance with code requirements.
- Clean your barbecue regularly.
- Never try to use industrial cylinders to fuel your barbecue.
- Always check for leaks with soapy water when changing the cylinder.
- Always check gas hose for cracks, work spots or slipped couplings.
- Always transport your cylinder in the upright position.
- Always store cylinders in the upright position.
- When using 100lb cylinder with a commercial barbecue, remember that the cylinder must be 10 feet away from the burner and must be secured in the upright position.
- Only allow trained staff to handle propane cylinders and change cylinders on barbecues.
- Always have at least one 10BC rated fire extinguisher on hand for each commercial barbecue in use.
- Never use burning paper, matches or cigarette lighters to light a barbecue.
Balloon Splash Instructions
Candy Floss Machine
- Place Machine on a flat, stable surface.
- Ensure Machine is in the ‘Unlock’ position.
- Plug in floss machine to a grounded outlet.
- With the Candy Switch “OFF”, turn the Power Switch “ON”. The spinner head will not start to rotate.
- With the spinner head stopped, pour flosssugar into the spinner head. Fill to about the 90% level. DO NOT OVERFILL.
- Turn the Candy Switch “ON”. The spinner head will rotate and heat. After about 30 seconds the machine will start to make cotton candy.
- When the spinner head is empty or to stop making cotton candy, turn the Candy Switch “OFF”. The cooling cycle will start. When the cooling cycle completes, the spinner head will stop rotating. If making more cotton candy, when the spinner head is stopped, refill with floss sugar, turn the Candy Switch “ON” and continue to make cotton candy.
Note: During the cooling cycle the spinner head will remain spinning. Cooling is necessary to keep carbon from forming in the spinner head. Do Not use the Power Switch to stop the machine. This will bypass the cooling cycle.
To transport the machine, ensure the machine is in the “Lock” Position.
Chafing Dishes

Chafing Dishes are a great way to keep your food warm for hours.
NOTE: Use only the proper canned fuel when operating
Tips:
- Place chafing dish in the location where you are serving the food
- Fill large water pan with hot water
- Light both cans of fuel while placed below the chafing dish
- Place food pan inside the water pan
- Maintain water level in pan to prevent burning
- To keep food warmer longer, replace lid after each serving is takenSave
- Sterno fuel will last 2 – 2 ½ hours
- You may use the food pans to cook in or you can place it in the oven prior to placing in the chafing dish so it
will stay hot longer - Prior to returning, please empty all food from the inserts
Champagne Fountain
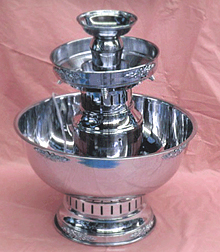
NOTE: The fountain must be properly grounded to prevent electrical shock.
Beverage Fountains are designed to circulate clear beverages. Use of beverages with pulp, seeds, fruit, rinds, ect. Will restrict the flow of beverage and potentially clog the motor.
Operating Instructions:
- Plug fountain in to grounded electrical outlet
- Fill fountain with approximately 2 quartz of your choice of punch or champagne (be sure not to use punch with pulp as it will clog the motor and prevent fountain from working)
- Turn switch at the bottom to on position and fountain will start to work (it takes about one minute for the punch to make its’ way to the top)
- Be sure to keep punch at a level above the motor to ensure it doesn’t run dry
- When finished empty contents of fountain and return to Tiffany Party Rentals on your scheduled date
- DO NOT ATTEMPT TO CLEAN OR DISMANTLE FOUNTAIN IN ANY WAY
Helpful Hints:
- To chill a beverage, use chunks of ice in the bowl, or ice cubes sealed in a plastic bag to prevent dilution of punch
- Pre-cool beverage whenever possible
- Carbonation will dissipate after 10 to 20 minutes of re-circulating in the fountain (add smaller quantities of the mixtures from time to time to maintain carbonation
Coffee Urns
- Always use coffee maker on a dry, level surface.
- With basket and stem removed, fill coffee maker with COLD water to desired measurement.
- Press stem into heating unit well in bottom of coffee maker, put basket on stem and fill with appropriate amount of coffee (see tables below). Be sure not to let grounds fall through stem.
- Put cover on coffee maker and plug into 120 volt AC grounded outlet only, turn switch to on.
- The coffee maker will stop perking automatically. Coffee is ready when light in base glows. Coffee will remain at serving temperature as long as it remains plugged in and switch is on.
- Before serving, use pot holder to remover stem and basket containing grounds. If this is not done, coffee will become bitter.
- For cup-on-saucer filling, press faucet handle down. For a continuous flow when filling a coffee server, lift handle straight up until it locks into open position.
- When coffee can no longer be seen in glass gauge, turn switch to off and unplug coffee maker.
- Please note: Coffee maker must cool down prior to making a second batch of coffee.
Game Wheels
One or more laydown mats can be used. Bets are placed on any of the six designs.
When the wheel stops, the payoff is according to the position of the clapper. Remember always collect from the losing bets first, then pay the winners!
Crown & Anchor Wheel
If the clapper were as follows: crown, spade, diamond, then each of these would receive their money back i.e. they have doubled their money. If the clapper stops at 3 crowns, then the pay-off is three to one. i.e. The players with their bets on the crown would get their original money plus three times
Over & Under Wheel
This game is very simple to play and manage.
When the clapper stops on the over or the under, then those in this position win an equivalent amount. i.e. They have doubled their money.
If the clapper stops on the seven, the pay off is three to one i.e. they get their original money back plus three times
Racehorse Wheel
When the wheel stops, the clapper will point to the odds and the winning horse.
The odds are the numbers on the outer edge of the wheel.
For instance, if the clapper points to horse #4 and the odds are indicated by the clapper pointing at #5, all those who placed a bet in the #4 position will be paid off on a 5 to 1 basis. i.e. They will receive their original money back plus five times
Golf Challenge
Packing List
|
Quantity
|
Item
|
Replacement Cost
|
|
1
|
Canvas screen
|
$850.00 each
|
|
2
|
Four way fittings
|
$30.00 each
|
|
2
|
Elbow Fittings
|
$ 20.00 each
|
|
3
|
Tubing (crimped)
|
$ 16.00 each
|
|
4
|
Tubing (uncrimped)
|
$ 16.00 each
|
|
4
|
Stakes
|
$ 5.00 each
|
|
1
|
Right handed golf wedge
|
$ 30.00 each
|
|
1
|
Left handed golf wedge
|
$ 30.00 each
|
|
4
|
Velcro golf balls
|
$ 4.00 each
|
|
1
|
Chipping mat
|
$ 40.00 each
|
|
1
|
Storage case
|
$ 160.00 each
|
Safety Guidelines
Be sure that there is plenty of clearance between the player and the spectators. Remember that the risk always exists that the player could lose their grip on the golf club and send it flying backwards. The type of injuries which can result from being struck by a golf club in mid-swing can be severe. Prevent this from happening by assuring a safe distance between player and spectators.
If using the game outdoors, it is strongly suggested that you use the stakes provided on either side of the bottom supports. NEVER USE THE GAME IN STRONG WINDS OR LIGHTING.
Use caution when setting up or taking down the game – the sections of tubing can come apart and fall down causing injury. Use only the Velcro golf balls included with the game.
Assembly Instructions
Select a level area to operate game with plenty of room to allow for a line to form and a safe distance between player and spectators.
Assemble framework – note that the eight longer pieces of tubing are used to form the outer edges (2 per side), while the four shorter crimped pieces are used to create the base.
Be sure to tighten down the fittings using the small bolts on them.
Attach canvas to the framework using the Velcro straps.
If using the game outdoors, it is strongly suggested that you use the stakes provided on either side of the bottom supports. Use sandbags on pavement
Never fold up canvas wet – Always allow to dry thoroughly first.
Ice Tables & Tubs
Fill n’ Chill Table
- Assemble height adjusters in table starting at the centre and following the lettered labels
- Make sure drain plug is in place
- Place a small amount of cold water in the bottom of the table
- Fill table with your beverages and/or food platters and bowls
- Our ice over and around beverages and food
- The table will hold up to 20 bags (75lbs) of ice, when using the height adjusters
- It will fit approximately 132 cans or bottles of beverages
- We have table skirting available for the fill n’ chill table
Large Galvanized Ice Tub
- Holds 192 12oz. bottles
- It will take up to approximately 25 bags (100lbs) of ice
- Great for use outdoors
- Put beverages in tub first, then fill with ice
Popcorn Machine
Note: Pop at least two batches of corn each time
1. Plug into a grounded electrical outlet
2. Turn all switches to the ON position
3. Let the kettle heat for approximately 4 minutes
4. Add oil bar from pre-measured popcorn packages
5. Let oil melt then add the kernels
6. Leave doors open when popping
7. Dump corn when popping is 95% complete to prevent burning
On your Final Batch turn kettle heat switch to off as soon as corn starts popping. When popping is complete, turn off motor switch. Keep popcorn warm with light warmer.
Troubleshooting: If corn is not popping, ensure the kettle heat switch is on and the sprocket at the top of the kettle is engaged with the kettle motor.
Remember your rental fee includes cleaning – do not attempt to clean or dismantle the machine.
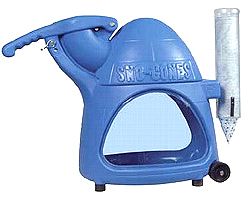
Snowcone Machine
The Snow Cone Machine is simple to operate and a great attraction for any event!
NOTE: The machine must be properly grounded to prevent electrical shock.
Tips:
- Start the motor and fill neck an inch from the top with ice pieces 3” x 4” or ice cubes. Hint: the larger the ice pieces, the better the snow.
- Push ice down against the blade with firm pressure using the arm of the machine. Hint: Do not force the handle. Too much pressure will cause coarse ice to form and too little will make it mushy.
- Do not put anything but ice in the neck of the machine to prevent damage.
- Keep fingers and long hair away from machine when motor is running or when machine is plugged in to prevent injury.
- When finished, empty the ice from the cavity of the machine and return to
Tiffany Party Rentals by the scheduled date and time.
Sound System
Opening and closing the speakers:
- Open latches on top of unit
- Lift speakers from the base with handle
- Turn upside-down and place in top of base
- Close side latches
- Open speakers up completely until they snap into one another
- Speaker grill must face forward & latches must be locked for system to work
Note:
The built-in CD player is shipped with an instructional CD inserted to help protect against damage. Please listen to the CD prior to operation for important care and use information. NOTE: to help protect the unit from damage, keep a disk in the CD player whenever it is being stored or transported
Causes of Feedback when using the microphone:
- Microphone too close, pointing towards or in front of speaker
- Volume setting is too loud for room
- Sound reflecting off hard surfaces
Troubleshooting Feedback:
- Point microphone in a different direction
- Keep microphone away from the speaker
- Place speaker in front of the microphone
- Reduce the sound system volume levels
The portable sound system is equipped with a removable travel dolly that features wheels and a retractable handle. To eliminate possible vibration from affecting the performance of the unit, we recommend that you remove the travel dolly before operating the system. Be sure to return travel dolly with equipment after rental period.